


The Case for the Defense
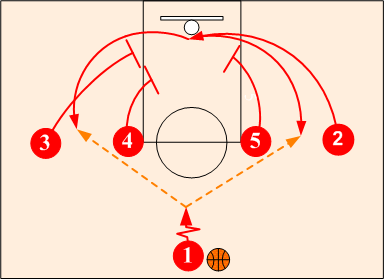
The Single/Double Offense involves the use of a double and down screen to free up a good shooter. If any of the defenders are not prepared to defend against and disrupt both double and down screens, it will most certainly result in a wide open shot for the opponent's best shooter.
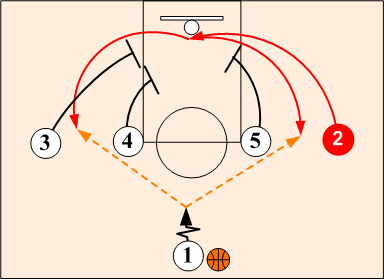
Single/Double's Schematic Sequence

Defensive Fundamental Skills Required
Defensive Strategies & Techniques Used To
Combat the Single/Double Offense Basic NBA Show & Recover
All Out SOS Disruption
Basic NBA Show & Recover
All Out SOS Disruption


Basic NBA Show & Recover
Since the Single/Double Offense involves "Bigs" screening for "Smalls" NBA teams do not like to switch. If the defense switches, the shooters will simply step out to the wings allowing the bigger screener to post up against the smaller defender. Therefore, "Show and Recover" is the preferred method used in the NBA to defend against the Single/Double's screening actions. However, defensive tactics will vary from one team to another and from player to player.
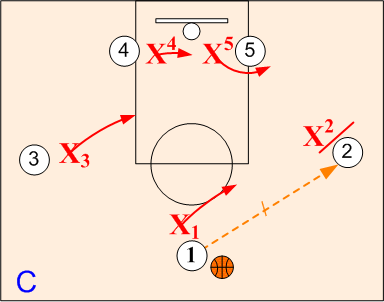
Phase 1. Dictating Shooter's Direction
Since most shooters prefer shooting on one side of the court or the other, the defender guarding the shooter should physically block and influence the shooter away from their most preferred side. The On-Ball defender should also pressure the ballhander toward the sideline away from the shooter.
Phase 2. Defending the Double Screen - "Show & Recover"
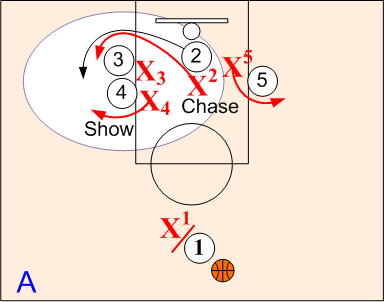
Show: When the shooter goes off the double screen, defender X4 guarding the screener O3 will step out ("Show") and force shooter O2 wide. Defender X2 chases O2 out under the screen. On-Ball defender X1, pressures the ballhandler hard toward the sideline.
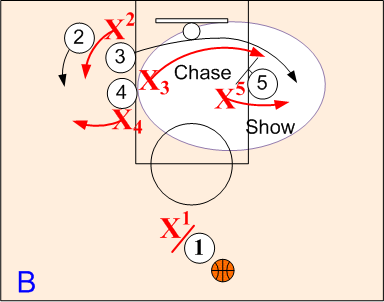
Weakside Show: When O3 breaks the double screen and goes out to the weakside off O5's screen, defender X5 steps out ("Shows") forcing the shooter O3 wide and defender X3 chases out under the screen.
Recover: After the screen, defenders X4 and X5 quickly release and "Recover" (dive) back to the screeners O4 and O5 assuming a strong three quarter pass denial position against screeners O4 and O5 posting up. Defenders X2 and X3 chase out and assume strong pass denial positions against shooters O2 and O3.
When ball is passed to O2 on wing, defender X2 pressures the ballhandler. Post defender X4 assumes a three quarter denial or plays behind post O4, physically pushing O4 away from the low block area. Weakside players X1, X3 and X5 "pack" it in toward the ball maintaining ball/man vision.
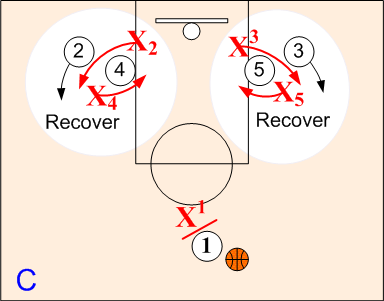
Phase 3: Defending the Single Screen Option
Show. When shooter O2 goes off the single screen and O3 pops out to the opposite wing, defensive players X4 and X5 step out hard and "SHOW" forcing the shooters coming off O4's and O5's down screens wide. Defenders X2 and X3 chase out hard against O2 and O3.

Recover. After the screen, defenders X4 and X5 quickly release and "Recover" (dive) back to the screeners O4 and O5 assuming a strong three quarter pass denial position against screeners O4 and O5 posting up. Defenders X2 and X3 chase out and assume pass denial positions against shooters O2 and O3.
Matching Up: When ball is passed to O2 on wing, defender X2 pressures the ballhandler. Post defender X5 fronts or plays behind post O5, physically pushing O5 "off the block." Weakside players X1, X3 and X4 "pack" it in toward the ball maintaining ball/man vision.
If the ball should be entered to a post player on a mismatch, most NBA teams will also be prepared to trap the post mismatch. They have the options of double teaming the post using any one of the weakside defenders.
All Out SOS Disruption
Single Double Offense
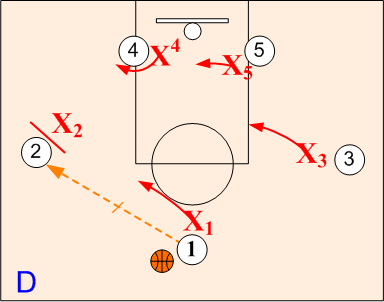
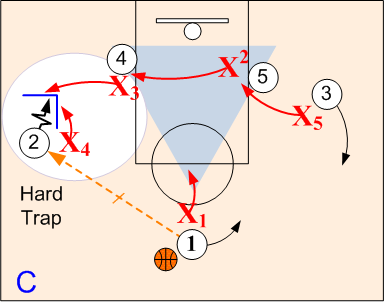
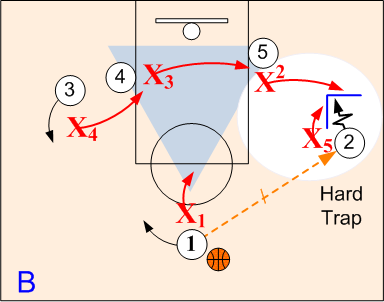
Total disruption of the Single Double Offense is achieved by having the defense initiating the action and trapping the shooter on the wing. The shooter is very vulnerable to this wing trap because the point guard is going away and setting a weakside screen for the opposite wing. In attacking and trapping the shooter, it forces the offensive players out of their planned routes and into a "free lance" situation. Once in this free lance mode, the defense can gain an advantage with execution of their SOS basic defensive fundamentals and team concepts.
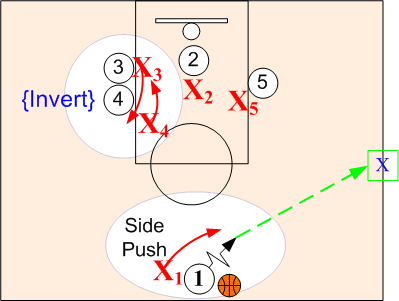
On-Ball defender X1 assumes an aggressive Set position forcing the ballhandler O1 toward a sideline pushpoint, preferably to their weak hand, preventing any mid penetration. Pushing the ballhandler toward the sideline also will initiate helpside defense action.
Also, whenever possible, double screen defenders X3 and X4 should INVERT (switch) defensive positions in order to keep the "Big" inside.
Note: It is best to pick up and push O1 to the sideline before crossing the midcourt line in an effort to force a high pick up and a longer passing lane. Half court traps can also be used very effectively.
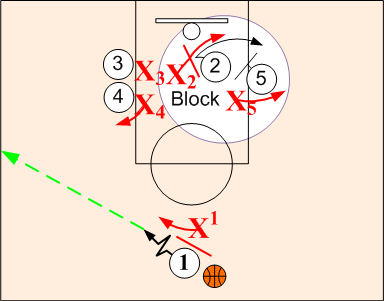
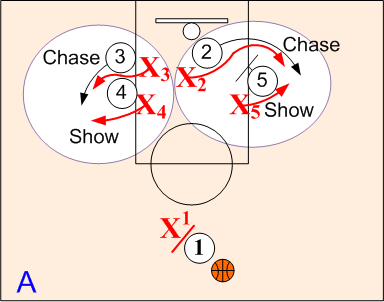
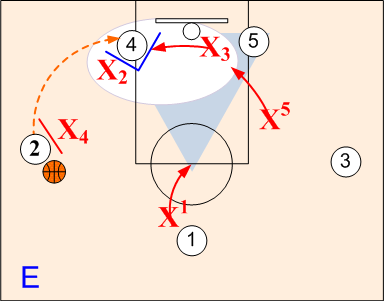
Phase 1. Disrupting the Double Screen Option
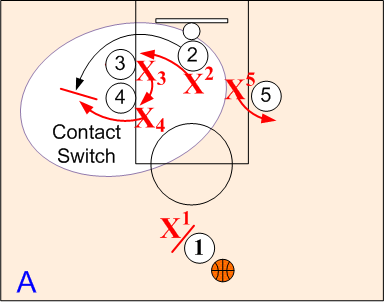
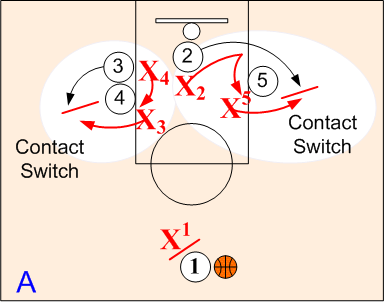
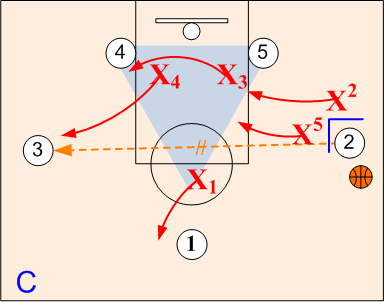
When shooter O2 goes off the double screen, sequential switches take place. Defender X2 switches to O3. Defender X3 switches to O4 assuming a strong Snuggle denial position. Defender X4 steps out and "Contact" switches assuming a strong Snuggle denial on shooter O2. Defender X1 pushes O1 out of the mid court area to a sideline pushpoint.
When screener O3 goes opposite of shooter O2, off O5's single screen, defenders X2 and X5 contact switch assuming strong Snuggle denial positions on O3 and O5.
When O1 point passes to shooting guard O2 on wing, X4 assumes an on ball Set position, influencing O2 to baseline checkpoint. Post defender X3 steps out and double teams O2 with X4 as O2 receives the pass. Defensive player X2 rotates over to a post front position and denies any pass to O4. Weakside defender X5 moves down to a low Triangle "I" position, and X1 assumes a high Triangle "I" position denying any reversal pass out of the trap.
Matching Up on the pass out of the trap to open O3, defender X5 closes out to O3, assuming an on ball Set position, influencing O3 to baseline pushpoint. Defender X2 fronts post O5 and defender X1 assumes a Snuggle denial positions on O1. Defenders X3 and X4 assume helpside "I" Strike positions on O2 and O4.
Caution: All close out rotations must take place as ball leaves passer's hands.
On O1's initial pass to O2, if O2 should pass over X2's post front to O4, on a mismatch, defender X3 covers and traps O4 with X2 while X5 drops to low Triangle "I" position and X1 moves to the top Triangle "I" position.
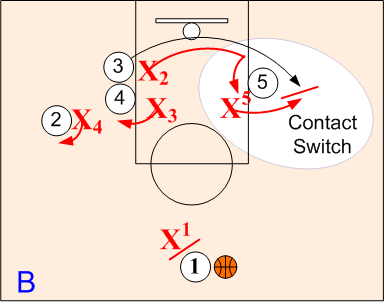
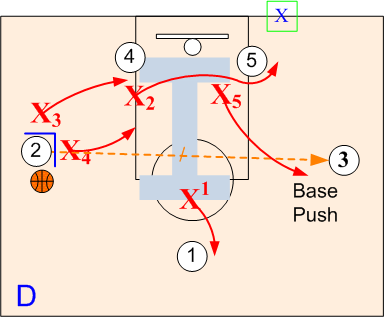
Phase 2. Disrupting the Single Screen Option
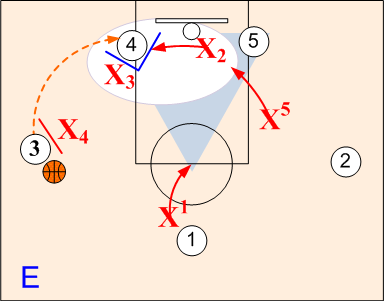
"Contact" switches on the down screens are made with defenders X4 and X5 stepping out into the passing lanes and assuming hard Snuggle denial positions against O2 or O3 coming off the down screens. Defenders X2 and X3 assume Snuggle denial positions against screeners O4 and O5 in the low post areas.
Wing Trap: When point passes to shooting guard O2 on wing, X5 assumes an on ball Set position, influencing O2 to baseline pushpoint. On pass to the wing, post defender X3 steps out and double teams O2 with X5 as O2 receives the pass. Defensive player X2 rotates over to a post front position and denies any pass to O5. Weakside defender X4 moves down to a low Triangle "I" position, and X1 assumes a high Triangle "I" position denying any reversal pass out of the trap.
When O2 passes out of the trap to open O3 on wing, X4 closes out and assumes an on ball Set position forcing O1 to baseline pushpoint. Defender X3 rotates back and Fronts O4 in the post area. X2 releases to a Low Helpside "I" Strike position against the O5 and X5 rotates to a mid Helpside "I" Strike position. Defender X1 closes out to a Snuggle pass denial position on O1.
Caution: All rotations must take place as ball leaves passer's hands.
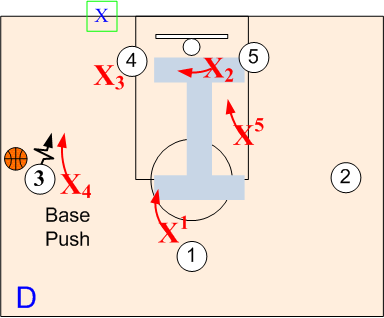
If O1 drives base, "Base Go I" or at the coach's discretion, "Base Go Red" scenarios are in effect. Defender X4 traps O3 with X3. Defender X2 rotates over to post O4, as X5 drops down to a low Triangle "I" position against O5. Defender X1 drops to the high Triangle "I" position ready to close out to O2 or O3 on O1's pass out of the trap.
If screening game is initiated, basic SOS defensive rules are in effect.
If wing O3 should pass over X3's post front to O4, defender X2 covers and traps O4 with X3, while X5 drops to low Triangle "I" position and X1 moves to the top Triangle "I" position.
