


The Case for the Defense
The Side Screen Offense involves a "Big" screening against a "Little". If the "On Ball" defender gets hung up on the screen it will most certainly result in successful dribble penetration. When the screener is a strong post up player or good outside shooter it presents additional problems for the defense.
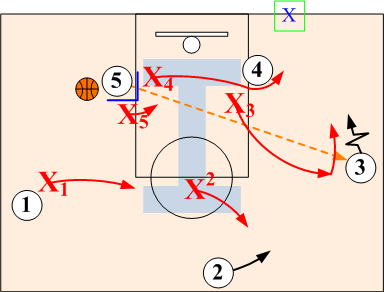
Side Screen Schematic Sequence

Defensive Fundamentals Required
Defensive Strategies & Techniques Used to Combat Side Screen Action


Basic NBA Show & Recover
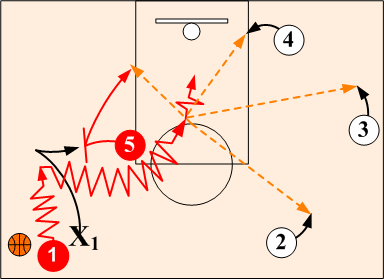
Since the Side Screen offense involves a "Big" screening for a "Small" most NBA teams do not like to switch. If the defense switches, the dribbler will simply flair allowing the screener to slide down and post up against the smaller defender; therefore, "Show & Recover" is the preferred method in the NBA in defending against side screen action. However, defensive tactics will vary from team to team and from player to player.
Phase 1. Show (sideline push)
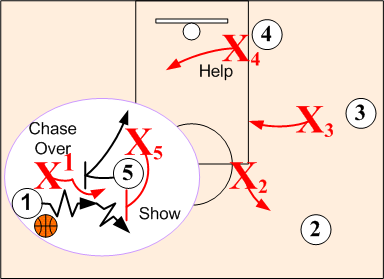
Show. Defender X5 steps out hard (SHOWS) forcing O1 wide off 05's screen. X1 chases O1 over X5's screen. Weakside defenders X2, X3 and X4 sag off to help out.
Phase 2: Recover
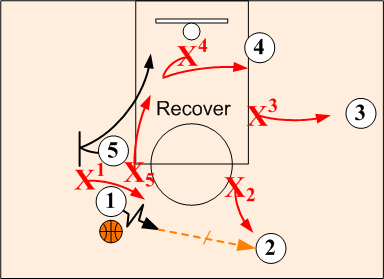
Recovering after the screen. Once defensive player X1 re-establishes a guarding position on point O1, X5 releases and RECOVERS (dives or sprints) back to post O5. When O1 passes out to O2, X2, X3 and X4 close out.
Note: Some NBA teams will also slide through the screen or will "Jam" and force the screener O5 into the ballhander's path allowing the on ball defender X1 to go behind the screen.
"SOS" Disruptions
SOS has three scenarios for combating Side Screens. One above the free throw line, one below the free throw line, and an All-Out Disruption.
Read: On Ball Screen Set ABOVE the Free Throw Line Extended

Phase 1. Contact Switch
Above the free throw line an aggressive contact switch is executed to deny all quick jump shots and middle penetrations. Defender X4 bumps screen O4 and then hedges out one stride directly into path of ballhander. Defender X3 moves to the inside of screener directly in front of screener forcing screener to go through his/her body.
Phase 2. Snuggle Pass Denial
After the aggressive contact switch X4 forces ballhandler to near side or corner checkpoint denying middle penetration or quick jumper coming off the screen. When ballhander stops dribble, X4 assumes a SMOTHER position. Defender X3, after screener rolls to the basket, moves into a SNUGGLE position to deny passing lane form ballhandler.
Phase 3. Smother
Defender X4 assumes aggressive SMOTHER position on the ballhandler to disrupt his/her passing vision into post area. X3 assumes a FRONT position on screener utilizing "slip front" technique. Other three defenders move into weakside "I" positions assuming "I" responsibilities in a low semi-flexed stances with vision on ballhandler. Basic SOS rules are in effect.
Read: On Ball Screen Set BELOW the Free Throw Line Extended
Below the free throw line, an aggressive trap is utilized near the base or corner checkpoints.

Phase 1. Baseline Trap
Defender X3 pushes ballhandler O3 towards base or corner check points while X5 leaves the screener before screen can be set, traps X3 from baseline area. Low I moves to open screener as screen is set.

Phase 2. Triangle I
Defenders X3 and X5 aggressively lock up the ballhandler while the Low I defender moves to the offensive strong side low post player assuming a 3/4 fronting position with other two defenders completing the "Triangle I."

Phase 3. Closing Out
On pass out of trap, all play defenders move to the nearest offensive play
All Out SOS Disruption
The third SOS scenario is total disruption of the Side Screen offense. Total disruption is achieved by the defense initiating the action before the first screen option can occur. In attacking and trapping the point guard before any screen or pass can take place, it forces the offensive players out of their planned routes and into a "free lance" situation . Once in this free lance mode, the defense can gain an advantage with execution of their basic defensive fundamentals and team SOS concepts.
Phase 1: Double Team (trap) Ballhandler
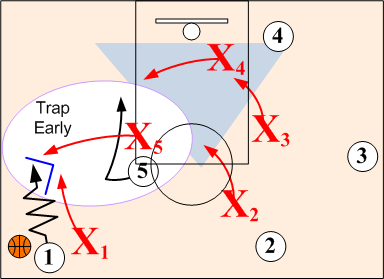
Defender X1 forces ballhandler O1 to baseline checkpoint and does not allow dribble penetration over O5's side screen. Defensive player X5 steps out and double teams (LOCKS UP) the point with player X1. Before side screen is set, X4 rotates over to low post to help out against post O5's roll to basket while X2 and X3 assume helpside Triangle "I" positions.
Phase 2: Pass Out of Trap
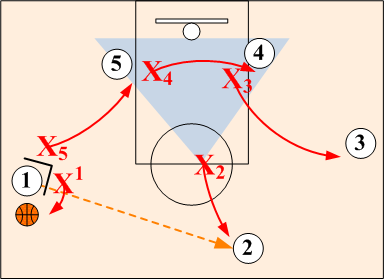
When O1 passes the ball out of the trap to O2, all players rotate according to the near player concept. X5 releases out of the trap with X5 diving hard to O5 in low post area while X1 assumes an aggressive SNUGGLE denial position on O1 preventing any return pass to O1. X2 closes out quickly to O2 and assumes an on ball SET position pushing O2 toward the sideline checkpoint. Defender X3 closes out to a SNUGGLE pass denial position of O3, and O4 rotates back to O4. Once matched up, basic SOS defensive principles are in effect.
Note: All rotations must take place as ball leaves passer's hands.
Secondary Trap (Pass to Screener on Base Roll)
Phase 1: Post Trap
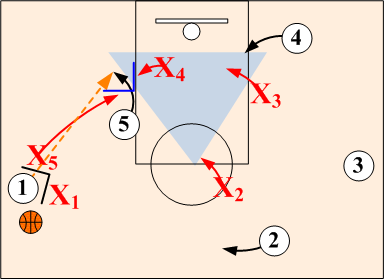
If O1 passes to O5 on base roll, X5 releases on pass forcing O5 to baseline. X4 comes along baseline to trap O5 with X5. X3 and X2 maintain Helpside "I" positions ready to closeout to O2 or O3.
Phase 2: Pass Out of Trap
When O5 passes out of the trap to open O3, X3 closes out and assumes an on ball SET position pushing the ball handler O3 to baseline checkpoint. X2 closes out and assumes a SNUGGLE pass denial position against O2. X4 rotates back and FRONTS O4 in low post area. X5 and X1 assumes Helpside "I" positions.
Defenders rotate according to O3's actions. If O3 drives base, "Base Go I" or at the coach's discretion, "Base Go Red" scenarios are in effect. If O3 passes over X4's post front, X5 covers and traps O4 with X4 while X1 drops to Low Helpside "I" position and X2 moves to a Top Helpside "I" position. If screening game is initiated, basic SOS defensive rules are in effect.
Note: All rotations must take place as ball leaves passer's hands.