- Offensive Techniques & Strategies


The Case for the Defense
For any team without a working knowledge in defending high post rubs, the UCLA offense will certainly result in easy layups. In addition, the quick reversal down screens will create severe problems and easy baskets for any team not prepared to defend them.
Defensive Fundamentals Required
UCLA Schematic Sequence

Defensive Strategies & Techniques Used To
Combat the Zipper Offense


Basic NBA Show & Recover
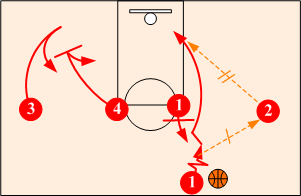
Since the high post rub involves a "Big" screening against a "Little," most NBA teams do not like to switch. If the defense switches, the cutter will simply clear out to the corner allowing the screener to slide down and post up against the smaller defender.
Phase 1: Show (Cutter Forced Inside)
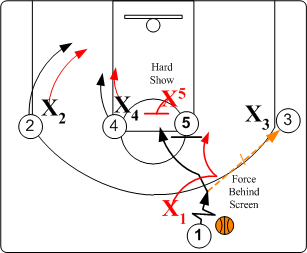
Influencing the cutter away from the ball and behind the high post's screen is the preferred method in the NBA in defending against the UCLA high post rub action. When O1 passes to wing O3, defender X1 denies O1's direct cut to the basket and forces O1 behind O5's high post screen. Defender X5 steps out and bumps (SHOWS) forcing O1 wide off screen. X1 pursues O1 by going over the top of O5's pick.
Phase 2: Recover
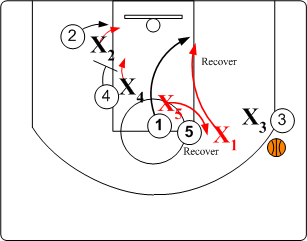
Defender X1 catches up and assumes a 3/4 pass denial position against O1 in low post area. X5 recovers back to a pass denial position against O5. The weakside defenders will also "pack in" (drop off) to congest the basket area.
Phase 3: Final Match Up
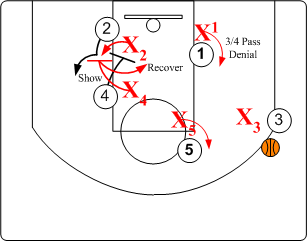
On the weakside, defender X4 "SHOWS and RECOVERS" against O4's down screen while defender X2 chases out. Matching up, defender X3 applies ball pressure and smothers O3. X1 assumes a defensive post position against O1, pushing O1 off the block. X2, X4, and X5 "Pack It In."

All Out "SOS" Disruption
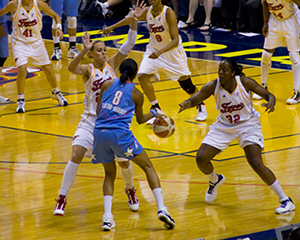
Total disruption of the UCLA offense is achieved by having the defense initiating the action and trapping the wing on the first pass. The UCLA offense is vulnerable to this wing trap because of the point guard's cut to the low post area. With the point guard in a low position, it is difficult for the wing to reverse the ball which is a key to defeating a double team. To be totally effective, however, both SOS individual defensive fundamentals and basic team concepts must be applied.
Phase 1: Trap on first pass
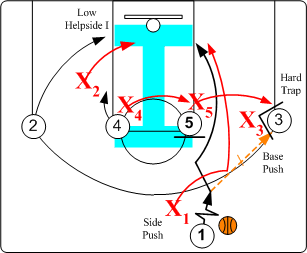
Defensive player X1 pushes the point guard O1 to sideline checkpoint. When O1 passes to the wing, and cuts to the low post, X1 assumes a snuggle pass denial position ending up in a post front position.
When wing O3 receives the ball, X3 assumes an on Ball Set position forcing O3 to the baseline checkpoint. X5 takes a pass denial position against high post O5. When O1 passes to O3, X5 releases out and double teams O3 with X3 on the wing. X4 in the high Helpside I position rotates over on trap into a pass denial position against O5. X2 assumes a low Helpside I position anticipating a pass out of the trap.
Phase 2: Pass out of the trap
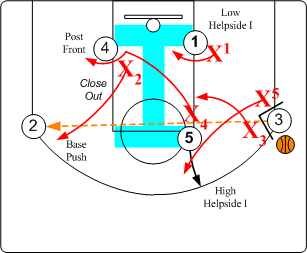
When O3 passes cross court to open O2 all players rotate according to the near player concept. X2 closes out and assumes an on ball Set position pushing O2 toward the baseline checkpoint. X4 dives down to O4 and assumes a post front position. X5 rotates out of the trap and assumes a pass denial position against O5 on the high post. X3 moves to a mid Helpside I position, and X1 moves into the low Helpside I position.
Note: All rotations must take place as ball leaves passer's hands.
Phase 3: Final Match Up
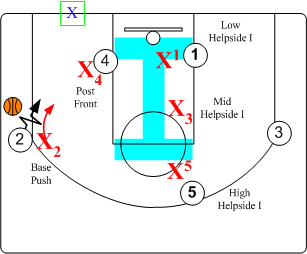
Once matched up, basic SOS defensive principles are in effect. X1 assumes a low Helpside I position against O3. X2 pushes ball handler O2 to baseline checkpoint. X3 maintains a mid Helpside I position against O1. X4 assumes a high Helpside I pass denial position against O4, and X5 fronts O5 in low post.
© 2026 HoopTactics All Rights Reserved.

