

What to Discover or Recall . . .
Individual players and teams must be well prepared to defend against baseline drives.
On baseline drives, defenders must defend with their legs using knees apart, quick push or shuffle steps. Both hands should be held above the shoulders to discourage and contest the shot or pass options.
When guarding a player on the wing, on a baseline drive whoever gets to the "Block" first will win the battle.
When the ball handler does drive baseline, the Helpside defenders have three support options available: Fake Trap (Show & Recover), Trap or Trap Early.
All baseline support options are augmented by quick close outs.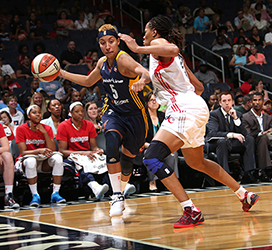
Baseline Disruptions
| Show & Recover | Double Team | Trap Early | Breakdown Drills |
With the on BALL defender pressuring the ball handler to the corner or baseline pushpoint, once ball reversal is denied and “Box Pressure” created, the offensive player’s options are basically limited to a baseline drive. Therefore, teams should be well prepared to defend against the baseline drive. If/when the ball handler does drive baseline, the off ball defenders have three support options available: Fake Trap (Show & Recover), Trap and Trap Early. All baseline support options are augmented by quick close outs.
Schematic Sequence

Defensive Fundamentals Required
 Defending Against Dribble Penetration Providing Strong Backside Support

Option 1. Primary Option
Straight Up One-On-One Defense With Backside Support
The defender guarding the ball handler must take pride in their individual defense and play as if no help was available. When defenders can successfully defend one on one, it really makes a huge impact on a team’s defensive performance. On the other hand, when defenders rely solely on backside support it to bail them out, it only results in lazy efforts and poor defense.
Read: Defender pushes ballhander BELOW the block.
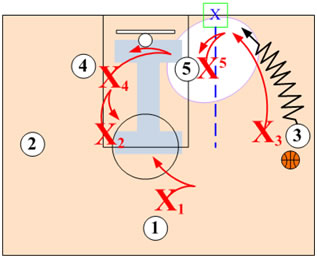
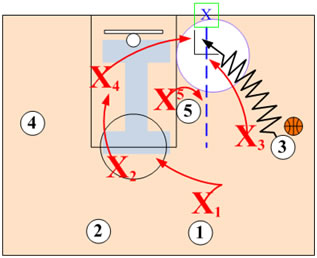
Low Post Rotations
Defender X3 pushes the ball handler to the corner or baseline pushpoint. Post defender X5 steps out and “Shows” on O3’s dribble penetration. If at all possible, X5 should take an offensive charge. X2 drops to the low Helpside I position on O4. O1 assumes a high Helpside position anticipating a pass out to O1 or O2.
Once defender X5 sees that X3 has successfully forced the dribbler to the baseline pushpoint, X5 recovers back to post denying any pass from O3.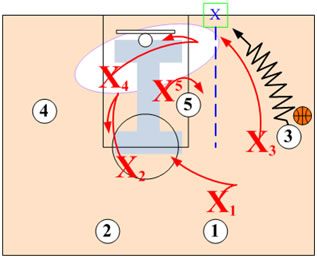
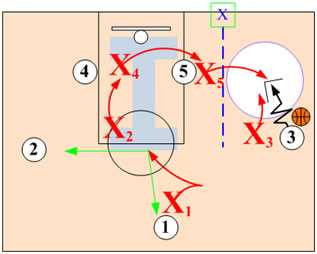
Mid or High Post Rotations
Low Helpside I defender X4 shows on wing O3’s dribble penetration anticipating taking an offensive charge. X2 drops to the low Helpside I position and X1 assumes a high Helpside I position.
Once X4 sees that X3 has successfully forced the dribbler to the baseline pushpoint, defenders recover back to their Helpside I position anticipating a pass.
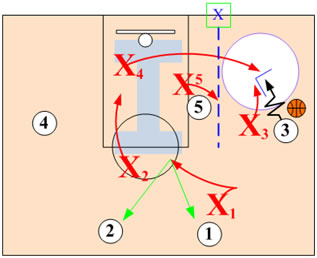
Option 2. Baseline Trap (Automatic)
If/when the wing penetrates above the block on the free throw lane or beyond the baseline pushpoint an automatic baseline double team takes place. The low helpside defender rotating over to take an offensive charge or trap double team the dribbler.
Read: Defender is beat or dribble penetrates ABOVE the block.
Low Post Rotations
If/when the wing penetrates above the block or beyond the baseline pushpoint, post front defender X5 traps O3 with X3. X4 rotates to O5 and X2 drops to the low Helpside I. X1 moves to a high Helpside I position anticipating a pass out to either O1 or O2.
Mid or High Post Rotations
If/when the wing penetrates above the block or beyond the baseline pushpoint, low helpside I defender X4 rotates over and traps O3 with X3. X5 maintains a pass denial position of post O5 and X2 drops to the low Helpside I. X1 moves to the high Helpside I position anticipating a pass out to either O1 or O2.
Option 3. Trap Early
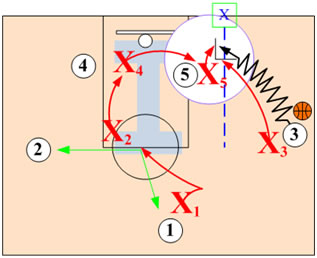
If the ball handler is a real threat to score off baseline penetration, trap early by going “Green” (trap) on the first dribble.
Read: Defender is mismatched on wing
Low Post Rotations
Post steps out and traps ball handler O3 with X3 on first dribble. X4 rotates over to a baseline pass denial position on post O5. X2 drops into the low Helpside I position and X1 moves to a high Helpside I position anticipating a pass out to either O1 or O2.
Mid or High Post Rotations
Defender X4, in the low Helpside I position, releases on first dribble and traps O3 with X3. X2 drops to the low Helpside I, and X5 maintains a pass denial position on O5. X1 moves into the high Helpside I position anticipating a pass out to either O1 or O2.
Drills for Skills
Breakdown Drills:
 Double Close Outs - Baseline Dribble Penetration (1-on-1)
Return to Defensive Strategies - Click Here
Return to HoopTactics - Click Here