
Basic Defensive Concepts & Principles
What to discover or recall:
Defensive basic concepts and principles include trap zones, red zone, push points, Helpside "I", and Box Pressure.
That the out of bounds lines are a defender's greatest ally.
By keeping the ball out of the middle of the court it cuts down the offensive operating area and establishes backside support.
In assuming Helpside “I” positions, defenders can help out teammates, double team, deny ball cuts, take charges, and rebound.
Creating Box pressure provides the defense with a numerical advantage.
Neutralizing the Offensive Advantage
| Trap Zones | Red Zone | PushPoints | Helpside I | Box Pressure | In Review |
Obviously in the game of basketball, the offensive player has a big advantage over a defensive player. However, Disruptive Pressure Defense can neutralize this advantage with sound defensive fundamentals and teamwork. Team defense does not only eliminate all one-on-one isolations and player mismatches that may occur during a game, but it also provides defenders with strong, helpside support and quick hitting double teams which, in turn, allows them to exert more pressure on the ball hander without any fear of getting beat.
Because basketball players spend most of their time and efforts developing and refining their offensive skills, they are usually very ill prepared defensively. Yet, despite having little or no defensive skills, coaches still expect their players to be able to go out guard outstanding offensive opponents. However, for them to be successful, players must first possess a working knowledge of the basic defensive concepts and fundamentals. These basic concepts include: Trap Zones, Red Zone, Pushpoints, Helpside I, and Box Pressure.

Trap Zones
Out of Bounds Lines are the Defender's Greatest Allies!
Out of bounds lines are tenacious defenders that never make a mistake. Defenders should take full advantage of the out of bounds lines to form trap zones. There are two types of trap zones: Primary and Secondary.
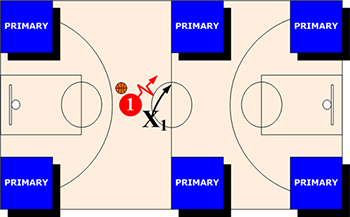
Primary Trap Zones
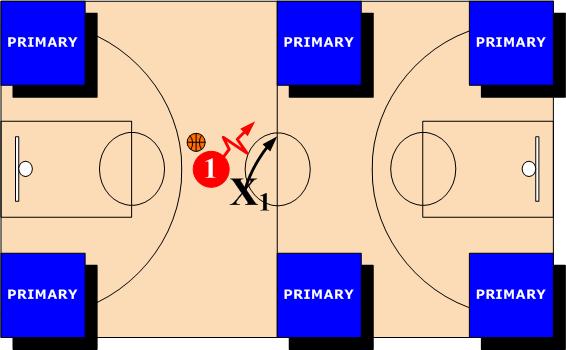
Primary trap zones are the corners of the court where the defense can take advantage of two out of bounds lines to trap and lock up the offensive player. There are six primary trap zones. Two are in the back court and four are in the front court.
Secondary Trap Zones
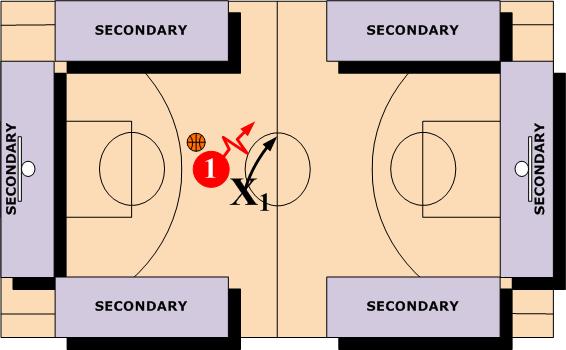
Secondary trap zones are the sideline or baseline locations where, defensively, one out of bounds line comes into play. Defenders should be constantly pushing and forcing ballhandlers into trap zones. When successful, it definitely provides the defense with a tremendous advantage.
"Red Zone"
Keeping the Ball Out of the Middle of the Court
One of the most important principles of defense is to push the ball hander toward the sideline. In keeping the ball out of the middle it not only cuts down and minimizes the offensive operating area on the court, but, in addition, it also establishes helpside defensive support.
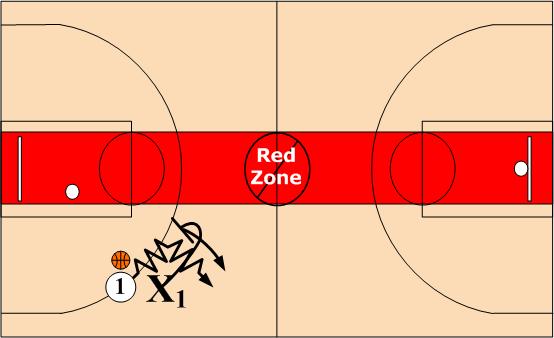
The "Red Zone" in the width of the free throw lanes and runs the full length of the court endline to baseline.
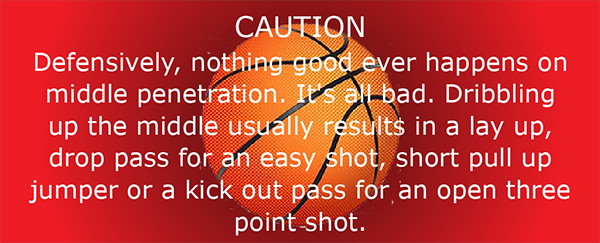
Middle Penetration
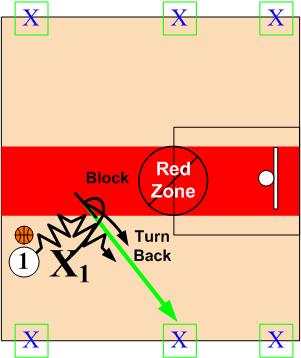
If the ball handler should penetrate into the middle, the defender should physically block and turn the dribbler back to the sideline.
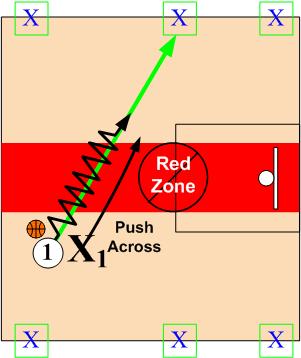
If/when the defender is unable to turn the ball handler, force the dribbler across the red zone to the opposite sideline.
PushPoints
Pushpoints represent specific spots on the court for the defender to push or influence the opponent with the ball. These exact locations are located along each sideline and baseline. They include the corners, free throw line extended, baseline and half court.

Defenders should influence the ballhandler to the nearest sideline or baseline pushpoint. In influencing a ballhandler toward a pushpoint, it cuts down and minimizes the offensive operating area.
When a defender is unable to maintain leverage and force the ball handler to the desired pushpoint, they should just force to the next pushpoint.
Ball Located on the Wing
When the ball is on the wing, the defender should make every attempt to push the ball handler, below the block, toward the baseline pushpoint. However, if the dribbler tries to drive into the middle of the court, the defender should protect the elbow, and force the dribbler over the top of the circle.
Ball Located at Top of Circle
When the ball is located in the high post area, the defender should make every attempt to protect the "Elbows" and push the ball handler towards a corner pushpoint.
Helpside "I"
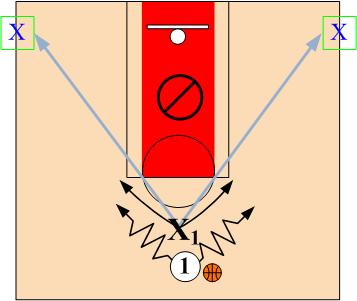
Defenders should be aware of their location in relationship to the ball handler at all times. By pressuring the ballhandler to sideline "PushPoint," it enables the defensive players on the opposite side of the floor to sag off their opponents and establish strong, backside support positions. This backside support position is known as the "Helpside I."
Just like trying to catch a rabbit or chicken, if you chase after it or try to cut it off you are going to be unsuccessful. However, you will be successful in catching it if you herd it into a corner. Disruptive Pressure Defense works in a similar manner. By using sideline PushPoints along with preventing ball reversal, it will box the offense into a corner.
In assuming Helpside "I" positions, defenders can help out teammates, double team, deny ball cuts, take charges, and rebound. Helpside support also neutralizes any offensive player advantages along with eliminating all one-on-one isolations.
Double "I" (Low/High)
A Double Helpside "I" defensive alignment is created when the post is deployed on the ball side of the court. From this alignment two defensive (Low/High) players are in position to provide for strong defensive help.
Triple "I" (Low/Mid/High)
When the offense deploys the post on the side of the court away from the ball, it creates a Triple Helpside "I" defensive alignment. This alignment will allow three defensive (Low/Mid/High) players to provide defensive help. Any one of the three " Helpside I" players can rotate to trap.
Inverting on Helpside
Players in the "Helpside I" positions should recognize when a big player is in a "High I" position and a smaller player is in a "Low I" position, and INVERT by interchanging positions whenever possible.
No Helpside Support
Box Pressure
Boxing the offense into a corner takes a coordinated team effort. The defender guarding the player with the ball needs to push the ball handler to a sideline or baseline pushpoint, all of the weakside defenders must assume "Helpside I" positions, and the reversal pass must be denied.
Once Box pressure is created, it doesn't only limit the area of the court that needs to be defended, but it also provides the defense with a significant numerical player advantage. If you count the baseline and sideline (two great defensive players that never make any mistakes) the numerical advantage becomes even bigger.
Five against Three Defensive Advantage
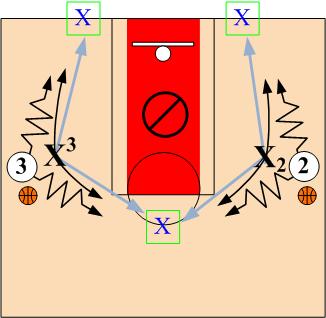
Boxing the opponent into the corner creates a 5-on-3 numerical advantage for the defense when the offensive post sets up on the ball side of the court.
Five against Two Defensive Advantage
If/when the post assumes a weakside position, box pressure affords an even bigger advantage in creating a five (seven if you count the two out of bound lines) against two situation.
Preventing Ball Reversal
Preventing the ball reversal is the key to creating box pressure. In denying the ball reversal pass, it will force the ball handler into dribbling or making a difficult pass.
Allowing Ball Reversal
Allowing ball reversal (sideline to sideline) forces the defense to defend the entire court .
NOTE: During ball reversal is the time that the defense is most vulnerable. All defenders must transition from either an "Off Ball" to an "On Ball" position or vise versa from an "On Ball" to an "Off Ball"position, exposing them to attack. This is why most offenses have quick hitting, weakside options, and why ball reversal is such a key ingredient of zone offenses.
Do Not Allow Middle Dribble Penetration
Allowing dribble penetration into the middle (Red Zone) takes away the defensive help and eliminates box pressure.
In Review
- By employing a few basic concepts the defense can gain control of the game, and put the offense at a distinct disadvantage.
- Out of bounds lines are tenacious defenders that never make a mistake.
- Defenders should take full advantage of the out of bounds lines to form primary and secondary trap zones.
- Defenders should work hard to prevent dribble penetration down middle of the court by influencing their opponent to a sideline or baseline pushpoint.
- Pushpoints represent specific spots along each sideline and baseline, and include the corners, free throw line extended, baseline and half court.
- In keeping the ball out of the middle of the court (“Red Zone”), it not only reduces the offensive operating area, but it also creates helpside defense.
- Defensively, nothing good ever happens on middle penetration – it’s all bad.
- In assuming Helpside “I” positions, defenders can help out teammates, double team, deny ball cuts, take charges, and rebound.
- When the weakside defenders do not sag off into Helpside “I” support positions, it opens up the entire middle of the court and actually encourages dribble penetration into the middle.
- By using the sideline pushpoints along with preventing ball reversal, it allows the defense to box the offense into a corner.
- Boxing the opponent into the corner of the court creates a numerical advantage for the defense.
- Preventing the ball reversal is key in maintaining box pressure.

Return to Defensive Strategies - Click Here
Return to HoopTactics - Click Here