- Offensive Techniques & Strategies

Shadow Press
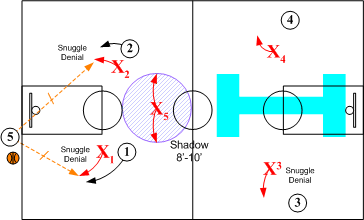
Shadow Pressure refers to the action that requires one defender to "Shadow" at a distance approximately 8 feet to 10 feet behind, the teammate who is pressuring the ball handler. It is the basis of SOS full court disruptions. The player in the "Shadow" position, in order to keep the ball handler off balance and confused, has three options (trap, hold or jump switch). The Shadow position is interchangeable dependent of which offensive player is the inbounds passer.
| Shadow Trap | Shadow Hold | Shadow Switch |

Shadow Trap Option
On made shots, the player defending the inbound passer sprint releases to a "Shadow" support position 8' to 10' directly behind X1 and X2 ready to deny any over the top pass to O1 or O2. Once ball is inbounded the Shadow X5 then shadows the ball handler supporting the on ball defender X1 to apply extreme defensive pressure.
Phase 1: Shadow Action.
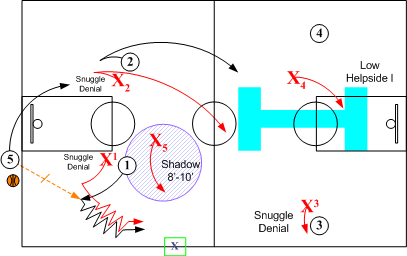
When the ball is inbounded to O1, X1 after initially assuming a SNUGGLE pass denial position on O1, moves to an ON position and pushes O1 to side checkpoint. Defender X2 rotates from a SNUGGLE denial position on O2 to a high Helpside "I" position. X3 maintains a SNUGGLE pass denial position on O3. X4 rotates to a low Helpside "I" position. "Shadow" X5 shadows ball handler O1 moving into position to trap O1 with X1 on near sideline checkpoint. If ball is inbounded to O2, X2 assumes the ON position with X5 assuming a "Shadow" position behind X2. X4 maintains a pass denial SNUGGLE position on O4, and X1 and X3 rotate into Helpside "I" positions.
NOTE: when any time the shadow player X5 is unable to get into proper position, Shadow pressure is off and basic half court oriented SOS rules apply. Also, on any deep outlet or outlet into the middle of the floor, Shadow pressure is not feasible, and basic transition pressure defense is in effect.
Phase 2: Double Team (Trap).
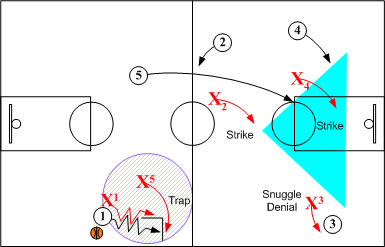
X1 and "Shadow" X5 lock up and trap dribbler O1 on near sideline checkpoint. X2, X3 and X4 form a Helpside Triangle "I." In the Shadow position, X5 has options of trapping the ball handler O1 with X1 or faking the trap (Hold) according to read or coach's decision. X4 assumes a SNUGGLE pass denial position on O4 while X2 and X3 assume Helpside "I" positions.
Phase 3: Matching Up
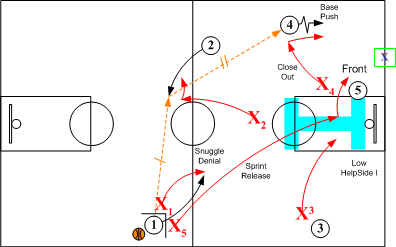
When O1 passes the ball out of the trap to O2, X2 closes out and pushes O2 to sideline checkpoint. X4 closes out to O4 and assumes a SNUGGLE pass denial position. X5 sprint releases to the basket and guards O5. X3 drops into a low Helpside "I" position, and X1 takes a strong pass denial position against O1, preventing any return pass that would allow O1 to initiate the set offense. If O2 passes ahead to O4, X4 assumes a SET position and pushes O4 to corner or baseline checkpoint. X5 FRONTS O5 in low post area. X2 creates "Box Pressure" by assuming a Snuggle pass denial position on O2. X1 and X3 take Helpside "I" positions.
Caution: It is extremely important that all close outs and rotations take place as the ball leaves the passer's hands.
Phase 4: Secondary Baseline Trap
Anytime the ball is advanced on dribble or pass to an area below the free throw line extended, SOS Base Go I or at the coach's discretion Base Go Red rules are in effect. Often times teams are caught off balance, after advancing the ball through initial full court pressure, since they do not expect to encounter a second trap when they run their set offense.

Shadow Hold (Fake) Option
On the Hold option, the "Shadow" has to convince the ball handler that a double team is going to take place. After faking the double team, the Shadow sprint releases and back to the inbounder. The Hold option works extremely well when the ball handler O1 has a habit of picking up the dribble when double team. By mixing up the Trap and Hold (fake trap) options Shadow Pressure keeps the ball handler off balance and guessing.
Phase 1: Shadow Action.

The Hold option starts out the same as the Trap option. When the ball is inbounded to O1, X1 after initially assuming a SNUGGLE pass denial position on O1, moves to an aggressive ON position and pushes O1 to near side checkpoint. Defender X2 rotates from a SNUGGLE denial position on O2 to a high Helpside "I" position. X3 maintains a SNUGGLE pass denial position on O3. X4 rotates to a low Helpside "I" position denying any long pass. "Shadow" X5 shadows ball handler O1 moving into position to trap O1 with X1 on near sideline checkpoint.
Note: If ball is inbounded to O2, X2 assumes the ON position with X5 assuming a "Shadow" position behind X2. X4 maintains a pass denial SNUGGLE position on O4, and X1 and X3 rotate into Helpside "I" positions.
Phase 2: "Hold" (Fake Trap).
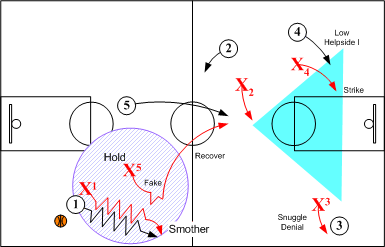
Defender X1 aggressive pressures O1 attempting to force O1 into changing directions and picking the ball up near . The "Shadow" X5 fakes the double team and at the mid court line releases back to a SNUGGLE pass denial position on the inbounder O5. X2, X3 and X4 form a Helpside Triangle "I". If the ball handler O1 picks up the dribble, defender X1 executes an aggressive SMOTHER while other defenders deny all passing lanes.
Phase 3: Pass Out of Smother
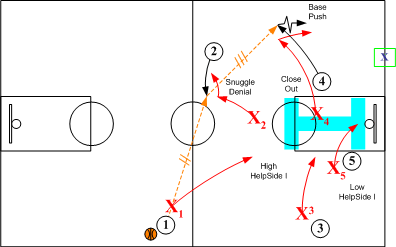
When O1 passes to O2, X2 closes out and pushes O2 to sideline checkpoint. X4 closes out to O4 and assumes a SNUGGLE pass denial position. X5 assumes a low Helpside "I" position against O5. X3 drops into a mid Helpside "I" position, and X1 takes a strong pass denial position against O1, preventing any return pass that would allow O1 to initiate the set offense.
Caution: It is extremely important that all close outs and rotations take place as the ball leaves the passer's hands.
If O2 passes ahead to O4, X4 assumes a SET position and pushes O4 to corner or baseline checkpoint. X5 FRONTS O5 in low post area. X2 creates "Box Pressure" by assuming a Snuggle pass denial position on O2. X1 and X3 take Helpside "I" positions. Anytime the ball is advanced on dribble or pass to an area below the free throw line extended, SOS Base Go I or at the coach's discretion Base Go Red rules are in effect. Anytime the ball is advanced on dribble or pass to an area below the free throw line extended, SOS Base Go I or at the coach's discretion Base Go Red rules are in effect.

Shadow Switch Option
Straight "Run & Jump Switch" is a third option that can be ran out out of the Shadow defensive alignment. It is used primarily as surprise element or change of pace. Shadow Switch is frequently used against smaller lineups.Initially, defender X1 INVERTS with the player defending the inbound passer X5 and assumes the "Shadow" support position 8' to 10' directly behind X5 and X2 ready to deny any over the top pass to O1 or O2.
Phase 1: Shadow Action.
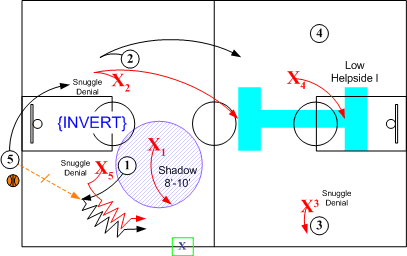
When the ball is inbounded to O1, X5 after initially assuming a SNUGGLE pass denial position on O1, moves to an ON position and pushes O1 to side checkpoint. Defender X2 rotates from a SNUGGLE denial position on O2 to a high Helpside "I" position. X3 maintains a SNUGGLE pass denial position on O3. X4 rotates to a low Helpside "I" position. "Shadow" X1 shadows ball handler O1 moving into position to execute a "Run & Jump" switch with X5 on near sideline checkpoint.
Note: If ball is inbounded to O2, X2 assumes the ON position with X1 assuming a "Shadow" position behind X2. X4 maintains a pass denial SNUGGLE position on O4, and X5 and X3 rotate into Helpside "I" positions.
Phase 2: Run &Jump (Switch).
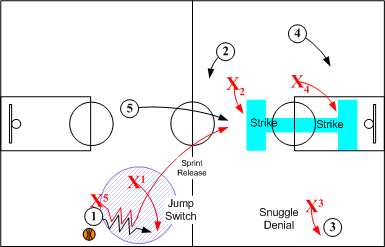
X5 forces O1 to near sideline checkpoint and then executes an aggressive jump switch on dribbler O1 with "Shadow" X1. X1 attempts to draw a charge or force O1 into picking up dribble. X1 then aggressively SMOTHERS O1. X5 sprint releases into a SNUGGLE pass denial position on O5. X3 maintains a SNUGGLE position on O3. X2 and X4 rotate into Helpside "I" positions.
Phase 3: Matching Up
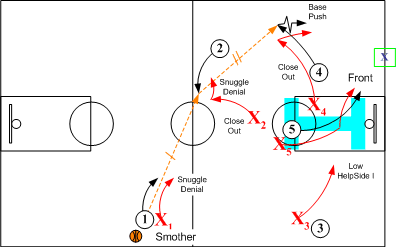
When O1 passes out to O2, X2 closes out and pushes O2 to sideline checkpoint. X4 closes out to O4 and assumes a SNUGGLE pass denial position. Defender X5 is in a SNUGGLE position on O5. X3 drops into a low Helpside "I" position, and X1 takes a strong pass denial position against O1, preventing any return pass that would allow O1 to initiate the set offense.
Caution: It is extremely important that all close outs and rotations take place as the ball leaves the passer's hands.
If O2 passes ahead to O4, X4 assumes a SET position and pushes O4 to corner or baseline checkpoint. X5 FRONTS O5 in low post area. X2 creates "Box Pressure" by assuming a Snuggle pass denial position on O2. X1 and X3 take Helpside "I" positions. Anytime the ball is advanced on dribble or pass to an area below the free throw line extended, SOS Base Go I or at the coach's discretion Base Go Red rules are in effect.Anytime the ball is advanced on dribble or pass to an area below the free throw line extended, SOS Base Go I or at the coach's discretion Base Go Red rules are in effect.
Return to Defensive Strategies - Click Here
Return to HoopTactics - Click Here
© 2025 HoopTactics All Rights Reserved.
