
SOS Disruptions
| Baseline | Side Screens |
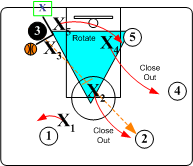
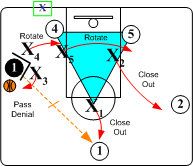
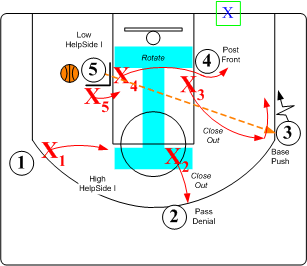
When the ball handler is in the wing area (free throw line extended) the defender pushes the ball to the corner or baseline checkpoints. The other four defenders employ basic SOS Off Ball techniques, such as first pass denials, fronting the post, assuming an Helpside I positions, etc. In this SOS Disruptive Pressure scheme, the purpose is to deny middle penetrations, weakside reversals and to limit the opponents operating space and movements.
When a ballhandler penetrates along the baseline, three (3) defensive actions can take place: First, the defender plays straight up and pushing the ball handler to corner or baseline checkpoint and then smothering them when they pickup their dribble. Secondly, when the dribbler penetrates inside the baseline checkpoint an automatic "Base Go I" trap takes place, and lastly, an early sideline "Base Go Red" trap can be initiated.
SOS Baseline Disruptions

| Straight | Base Go I | Base Go Red |
Straight SOS
The on the ball defender pushes the offensive player toward the corner or to the baseline checkpoint with all basic SOS rules are in effect. The low Helpside I defender is ready to trap ballhandler on any baseline dribbble penetration inside the baseline checkpoint. Note: prior to any penetration inside the baseline checkpoint, the low Helpside defender can disconcert the ballhander by showing (faking a trap) and recovering back into position once the dribbler picks up the dribble.
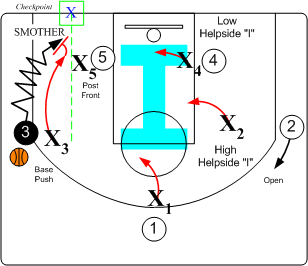
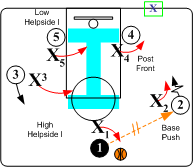
Phase 1. Straight SOS Defense.
When wing O3 receives a pass or dribbles the ball below the free throw line extended area, defender X3 pushes O3 to baseline checkpoint. When O3 stops dribble penetration or picks up the dribble prior to the baseline checkpoint, defender X3 assumes a hard "smother" position by crowding O3 with both hands up exerting maximum pressure on the shot or pass. All basic SOS rules are in effect.
Right Side Entry
When wing O2 receives a pass or dribbles the ball below the free throw line extended area, defender X2 pushes O2 to baseline checkpoint. When O2 stops dribble penetration or picks up the dribble prior to the baseline checkpoint, defender X2 assumes a hard "smother" position by crowding O3 with both hands up exerting maximum pressure on the shot or pass. All basic SOS rules are in effect.
vs Open Post Alignment
When O3 stops dribble penetration or picks up the dribble prior to the baseline checkpoint, defender X3 assumes a hard "smother" position by crowding O3 with both hands up exerting maximum pressure on the shot or pass. All basic SOS rules are in effect.
Note: All rotations occur as ball leaves passer's hands.
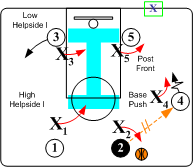
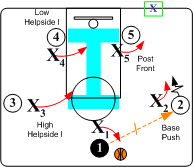
Automatic "Base Go I"
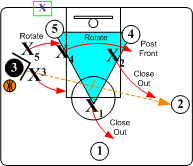
When the ball reaches the area of the free throw line extended, the defender on the ball pushes the offensive player toward the corner or to the baseline checkpoint. If the offensive player penetrates on the dribble inside the base checkpoint, an automatic trap takes place with the low "Helpdside I" defender quickly stepping out to "Lock Up" on a baseline trap. Other three defenders rotate into a Triangle I with all of the SOS "near man" defensive rules in effect.
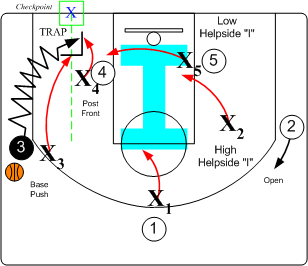
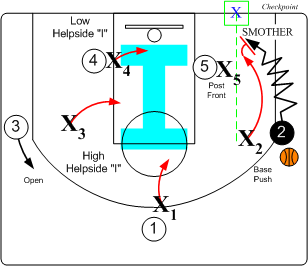
Phase 1. Baseline Trap.
Defensive player X3 pushes wing O3 to base checkpoint. When O3 penetrates on dribble inside the base checkpoint, the nearest defender, X4 steps out and traps O3, with X3. X5 rotates over and assumes a pass denial or post front position against O5. X2 drops to low Helpside "I" position against O4 and X1 assumes a high Helpside "I" position ready to closeout on O1 or O2. All players rotate simultaneously.
Note: No trap will occur, if offensive player does not penetrate inside the baseline checkpoint.
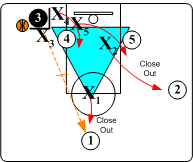
Phase 2. Pass Out of Trap
When O3 passes the ball out to O1, X1 closes out quickly to O1, pushing O1 toward sideline checkpoint while X2 closes out to a pass denial position against open O1. X5 rotates back to post O5, X4 rotates back to O4 as X3 stays with O3. Note: All rotations occur as ball leaves passer's hands.
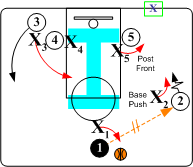
Phase 3. Final Match Ups
Once matched up, all SOS fundamentals apply. When O2 passes the ball to wing O2, defender X2 assumes a SET position pushing O4 to corner or baseline checkpoint. Defender X5 FRONTS the low post O5 while X1 assumes a pass denial position against O1. X3 and X4 assume Helpside I positions against O3 and O4.
vs Open Post Alignment
When the ball reaches the area of the free throw line extended, the defender on the ball pushes the offensive player toward the corner or to the baseline checkpoint. If the offensive player penetrates on the dribble inside the base checkpoint, an automatic trap takes place with the low "Helpdside I" defender quickly stepping out to "Lock Up" on a baseline trap. Other three defenders rotate into a Triangle I with all of the SOS "near man" defensive rules in effect.
Phase 1. Baseline Trap.
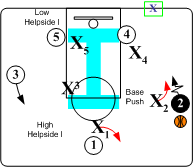
Defender X3 pushes wing O3 to baseline checkpoint. When O3 penetrates on dribble inside the base checkpoint, an automatic trap takes place with the low Helpside "I" defender, X5, quickly rotating over to double team O3, with X3. X5 rotates to the low Helpside I position, and X2 drops to a high Helpside "I" position ready to closeout on O2 or O4. All players rotate simultaneously.
Phase 2. Pass Out of Trap
When O3 passes the ball out to O2, X2 closes out quickly to O2, pushing O2 toward sideline checkpoint while X4 closes out to a pass denial position against open O4. X5 rotates back to post O5, and X3 stays with O3. All rotations occur as ball leaves passer's hands.
Phase 3. Final Match Ups
When O2 passes the ball to wing O4, defender X4 assumes a SET position pushing O4 to corner or baseline checkpoint. Defender X5 FRONTS the low post O5 while X2 assumes a pass denial position against O2. X1 and X3 assume Helpside I positions against O1 and O3.
No trap will occur, if offensive player does not penetrate inside the baseline checkpoint.
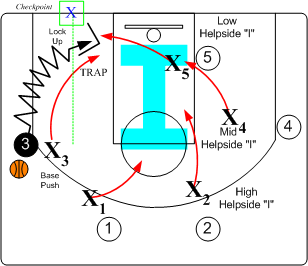
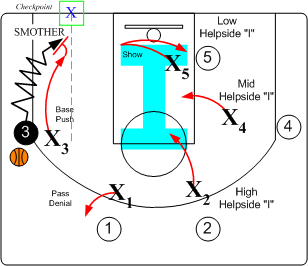
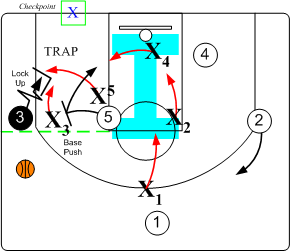
Base "Go Red"
Base Go Red is a predetermined early sideline trap that is used to keep the offense off balance. It is used in short intervals to change game tempo, create easy baskets and disrupt half court execution of an opponent's set offense.
When the ball is received or dribbled below the free throw line extended area, a sideline trap is immediately initiated with closest defender stepping out to execute the trap. As the trapping player steps out to initiate the trap, the other non-trapping players must rotate quickly into a Triangle I. Once the sideline trap takes place, all of the basic SOS Near Player rotation rules are in effect.
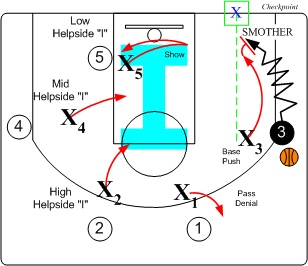
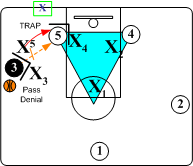
Phase 1. Early Sideline Trap.
Defensive player X3 pushes wing O3 toward base checkpoint. When O3 receivers a pass or dribbles the ball below the free throw line extended area, X4 steps out and traps O3 with X3. Defender X5 rotates over the top and assumes a post front position against O4. X2 drops to low Helpside "I" position against O5 and X1 assumes a high Helpside "I" position ready to closeout to either O2 or O1. All players rotate simultaneously.
Note: If the "Base Go Red" trap is set late near the baseline, then X5 must rotate over on base side of O4 and assume either a pass denial or post front position.
Phase 2. Pass Out of Trap
When O3 passes out of the trap to O1, all five players must rotate as the ball leaves the passer's hands. X1 closes out quickly to O1, pushing O1 toward sideline checkpoint while X2 closes out to a pass denial position against open O2. X4 rotates back to O4, X5 rotates back to O5, and X3 assumes a pass denial position against O3.
Phase 3. Pass Out of Trap
When O1 passes the ball to wing O2, defender X2 assumes a SET position pushing O2 to corner or baseline checkpoint. Defender X5 FRONTS the low post O5 while X1 assumes a pass denial position against O1. X3 and X4 assume Helpside I positions against O3 and O5. When matched up basic SOS fundamentals apply.
Note: All rotations occur as ball leaves passer's hands.
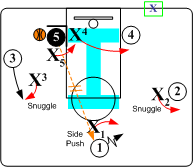
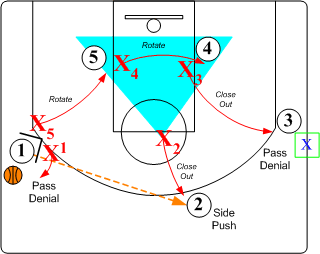
Side Screen Screen/Roll Disruptions
SOS "On Ball" switching has two scenarios. One above the free throw line and one below the free throw line. Above the free throw line an aggressive contact switch is executed to deny all quick jump shots and middle penetrations. Below the free throw line, an aggressive trap is utilized near the base or corner checkpoints.
Side Screen/Roll - "Below Free Throw Line"
When the offensive post O5 steps out to set a side screen and O3 is BELOW the free throw line extended, X5 immediately traps O3 with X3.
Phase 1. Hard Double Team.
Defender X3 forces O3 to base check point and then traps O3 with X5. X1 drops to a high "I" position, X2 moves down to the low "I" position, and X4 moves across from a low "I" position to a 3/4 snuggle denial or full front on O5 rolling to basket. X5 traps ball handler O3 BEFORE the side screen is set by O5.
Phase 2. Pass Out of Post Trap.

When O3 passes the ball out to O1, X1 closes out quickly to O1, pushing O1 toward sideline checkpoint. X2 closes out to a pass denial position against open O2. X5 rotates to low post O5. X4 rotates back to O4 and X3 assumes a snuggle denial position against O3.
Final Match Up. When O1 passes the ball to wing O2, defender X2 assumes a SET position pushing O2 to corner or baseline checkpoint. Defender X4 FRONTS the low post O4 while X1 assumes a pass denial position against O1. X3 and X5 assume Helpside I positions against O3 and O5. When matched up all of the basic defensive fundamentals apply.
Skip Pass Out of Trap.
When O3 makes a skip pass out to O2 on weakside wing, X2 closes out quickly to O2, pushing O2 to baseline check point. Defender X4 moves across and assumes a post FRONT position on O4. X1 assumes a snuggle denial position on O1. X3 and X5 drops into helpside I positions.
Final Match Up. If/when O3 passes to O4, defender X4 pushes O4 to the corner or baseline checkpoint. X3 assumes SNUGGLE position on O3 denying any return pass. Defenders X1, X2 and X5 assume helpside I positions ready to rotate into "Base Go Red" if 04 tries to penetrate on the dribble.
Pass Out of Trap to Low Post.
When O3 makes a pass out of the trap into O5 posting up, X5 immediately releases and double teams O5 with X4. Defender X3 assumes a snuggle denial position on O3. X2 and X1 maintain their Helpside I positions.
Final Match Up. If/when O5 passes out otf post trap to O1, defender X1 closes out and pushes O1 to sideline checkpoint. X2 closes out to a snuggle denial position on wing O2. X4 after trapping O5, moves back to O4 and O5 assumes a snuggle denail position on O5. X3 maintains a snuggle denial on O3.
Note: All rotations occur as ball leaves passer's hands.
Side Screen/Roll - "Below Free Throw Line"
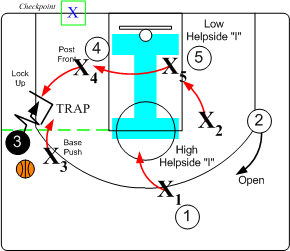
All Out SOS Disruption
Total disruption of the Side Screen offense is achieved by the defense initiating the action before the first screen option can occur. In attacking and trapping the point guard before any screen or pass can take place, it forces the offensive players out of their planned routes and into a "free lance" situation . Once in this free lance mode, the defense can gain an advantage with execution of their basic defensive fundamentals and team SOS concepts.
Phase 1: Double Team (trap)
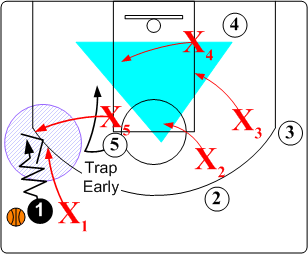
Defender X1 forces ballhandler O1 to baseline checkpoint and does not allow dribble penetration over O5's side screen. Defensive player X5 steps out and double teams (LOCKS UP) the point with player X1. Before side screen is set, X4 rotates over to low post to help out against post O5's roll to basket while X2 and X3 assume helpside Triangle "I" positions.
Phase 2: Pass Out of Trap
When O1 passes the ball out of the trap to O2, all players rotate according to the near player concept. X5 releases out of the trap with X5 diving hard to O5 in low post area while X1 assumes an aggressive SNUGGLE denial position on O1 preventing any return pass to O1. X2 closes out quickly to O2 and assumes an on ball SET position pushing O2 toward the sideline checkpoint. Defender X3 closes out to a SNUGGLE pass denial position of O3, and O4 rotates back to O4. Once matched up, basic SOS defensive principles are in effect.
Note: All rotations must take place as ball leaves passer's hands.
Secondary Trap (Pass to O5 on Base Roll)
Phase 1: Post Trap
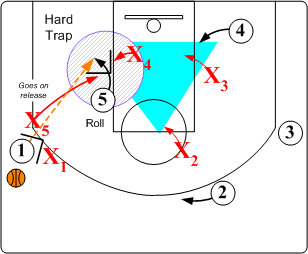
If O1 passes to O5 on base roll, X5 releases on pass forcing O5 to baseline. X4 comes along baseline to trap O5 with X5. X3 and X2 maintain Helpside "I" positions ready to closeout to O2 or O3.
Phase 2: Pass Out of Trap
When O5 passes out of the trap to open O3, X3 closes out and assumes an on ball SET position pushing the ball handler O3 to baseline checkpoint. X2 closes out and assumes a SNUGGLE pass denial position against O2. X4 rotates back and FRONTS O4 in low post area. X5 and X1 assumes Helpside "I" positions.
Defenders rotate according to O3's actions. If O3 drives base, "Base Go I" or at the coach's discretion, "Base Go Red" scenarios are in effect. If O3 passes over X4's post front, X5 covers and traps O4 with X4 while X1 drops to Low Helpside "I" positon and X2 moves to a Top Helpside "I" position. If screening game is initiated, basic SOS defensive rules are in effect.
Note: All rotations must take place as ball leaves passer's hands.

SOS Coaching Tools
SOS DVD
Three disk set
Price: $119.95
Order Now!Advanced DVD
DVD Price: $39.99
Order Now!SOS Book
Four Edition Price: $25.00
Order Now!