
SOS Basic Concepts
| SOS Do's | Sideline Push | Base Push | HelpSide I |
12 SOS Defensive "Do's"
-
Pressure players with ball to side, corner or base checkpoints using SET (triple threat offensive position) ON (defending the dribble) and SMOTHER (when players pick up their dribble).
-
Assume a contact SNUGGLE pass denial position when one pass away from the player with ball.
-
Assume contact FRONTS on all deep post ups using "Slip Front" technique with the Helpside I defenders in "vision/point" Strike Stances. Note: Use "Go Base" Post Traps when the post receives the ball away from the low block area.
-
Use "Box Pressure"once ball reaches the wing areas. At this point, the ball must be directed to the corner or baseline checkpoints, and all drives to the middle should be denied.
-
When the ball is in wing area, weakside defenders should provide backside help by assuming Helpside "I" (double/triple) alignment and executing their responsiblities.
-
Weakside players assume a Helpside Triangle "I" alignment whenever traps are set. When a pass is made out of the trap, all players rotate as as ball leaves passers hands with player in High Helpside I position closing out to player receiving the pass. All other defenders rotate to nearest offensive player.
-
Switch with contact on all OFF ball screens using "Screen/Over/Switch" verbal communications.
-
Use contact Traps against side screen/roll (before screen is set), and mid screen offensive scenarios.
-
Use contact traps on all dribble penetrations inside the baseline checkpoint.
-
Use automatic Contact Traps on all mismatches and when ball is in corner areas.
-
Act without hesitation using Near Player rotations whenever any unstructured offensive scenario occurs that differs from pre-planned SOS scenarios.
-
On all shot attempts, Box Out and get hands on the ball! "Flood the boards" with all five defenders. Must stress this rule since defensive rebounding is an Achilles heel of SOS Disruptive Pressure Defense.

Sideline Push
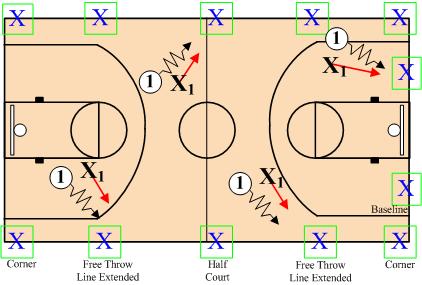
"Check Points"
One of the basic principles of disruptive pressure defense is to keep the ball out of the middle "Red Zone", and influence it into a trap zone. Checkpoints represent specific spots on the court for the defender to push or influence the opponent with the ball. These exact locations include the corners, free throw line extended, baseline and half court. Defensive players will quickly learn the value of checkpoints in their individual defensive efforts.
"Baseline Push" -- Take Away the Middle
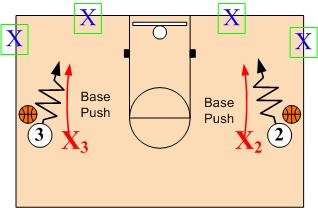
BALL ON THE WING
When the ball is on the wing, the defender should make every attempt to push the ball towards the corner or baseline checkpoints.
WING TURN
If/when dribbler tries to drive into the middle of the court, the defender should move quickly to cut off and force the dribbler back toward the nearest sideline checkpoint ending up with a "Smother" position.
WING Cross Switch
If/when the defender is unable to turn the dribbler and the dribbler penetrates to the free throw line area, the high I defender X2 makes a "Cross Switch" with on ball defender X3.
SOS Helpside "I"
"Providing Strong Backside Defensive Help"
Pressuring the ball to a sideline checkpoint will enable defensive players on the side opposite the ball to get away from their opponents, and establish Helpside I positions. Players assuming Helpside I positions are ready to either trap or rotate to the nearest player if/when a trap occurs. Helpside I players should also be alert to deny (BLOCK) any weakside cut by their opponent into the paint (3 sec area). If/when the ball is passed out of a trap, helpside players must quickly close out, on balance, to the nearest player.
Helpside Double "I"
When the offensive teams deploys three players on the ball side of the court, a Double I Helpside defensive alignment is created . From this alignment two defensive players provide for strong defensive by forming a Low/High alignment.
-
X1 prevents ball reversal by assuming a SNUGGLE contact pass denial position against O1.
-
X2 assumes a helpside High I position against O2 ready to rotate to O4 if a trap occurs.
-
X3 assumes an on ball SET position against O3, attempting to push O3 to baseline checkpoint.
-
X4 assumes a helpside Low I STRIKE position against O4 ready to rotate to O5 if an over the top post pass occurs or a trap occurs.
-
X5 assumes a post FRONT position against O5, ready to deny O5 or rotate to trap O1 on dribble penetration.
NOTE: Whenever possible, players in the Helpside I positions should recognize and INVERT (switch positions) any time a big player is in a Top I position and a smaller player is in the Low I position.
Helpside Triple "I"
If/when the offensive utililizes only two players on the ballside of the court, it allows the three helpside defenders to create a Helpside Triple I (Low/Mid/Top) defensive alignment.
-
X1 prevents ball reversal by assuming a SNUGGLE contact pass denial position against O1.
-
X2 assumes a helpside High I position against O2 ready to trap or rotate.
-
X3 assumes an on ball SET position against O3, attempting to push O3 to baseline checkpoint.
-
X4 assumes a helpside Mid I position against O4 ready to trap or rotate.
-
X5 assumes a helpside Low I STRIKE position against O5 ready to trap or rotate.

Helpside Triangle "I"(Sideline Trap)
If/when the defense traps, the three players not involved in the trap create a helpside Triangle I defensive alignment. Helpside I defenders must utilize all of the SOS Strike fundamentals.
-
X1 assumes an ON positon forcing dribbler O1 toward sideline and traps O1 with X3.
-
X2 assumes a Top I helpside position anticipating O1's pass out of the trap.
-
X3 traps O1 with X1.
-
X4 assumes a Low I helpside STRIKE position.
-
X5 assumes a Low I strongside POST denial position.
Near Player Rule: On pass out of trap, players close out to nearest opponent. Defenders must anticipate and rotate as soon as ball leaves passer's hands.
The Triangle "I" (Baseline Trap)
Triangle "I" (Baseline Trap)
If/when the defense traps on the baseline, the three players not involved in the trap create a helpside Triangle I defensive alignment.
-
X1 assumes a High I position anticipating O1's pass out of the trap.
-
X2 drops to a Low I helpside STRIKE position.
-
X3 takes an ON position and forces dribbler O3 to baseline checkpoint and traps O3 with X5.
-
X4 rotates over and assumes a Low I strong side POST denial position against O5.
-
X5 traps the dribble O3 with X3.
Note: On the pass out of the trap players rotate and close out using the near player rule.

SOS Coaching Tools
SOS DVD
Three disk set
Price: $119.95
Order Now!Advanced DVD
DVD Price: $39.99
Order Now!SOS Book
Four Edition Price: $25.00
Order Now!
-