
Teams Must Be Prepared For Three Different Jump Ball Situations
- Defensive Jump Balls: The opponent has a definite advantage and control is very doubtful.
- Even Jump Balls: Both teams have almost an equal chance of controlling the tip.
- Offensive Jump Balls: Your team has a definite advantage and the chances of controlling the tip are very good.
Defensive Jump Balls

On defensive tip situations, where the opponent has a 6” plus height advantage or superior jumper, encourage players to move and rotate early in order to gain a competitive edge. If a violation is called, nothing is lost since the defense will be better prepared when the opponent is awarded the ball out of bounds than it would be if the opponent gains possession of the jump ball.
Watch jumper’s eyes and hand in attempt to gain a competitive edge on jump. Jumpers will normally telegraph the direction in which they are going to tap the ball. Most right handed jumpers will tip forward to their left, and left handed players will tip forward to their right. Be sure to maintain contact with the jumper after ball is tipped since a significant number of jump ball plays involve the jumper.
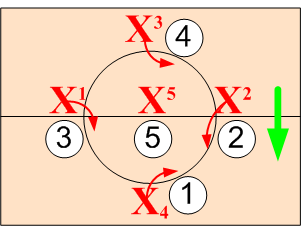
Box Alignment Rotations
")
It is crucial for defenders X1 and X2 to establish strong pass denial positions to prevent and disrupt any attempt to tip forward. The other two non-jumpers anticipate and rotate into opponent’s open spots.
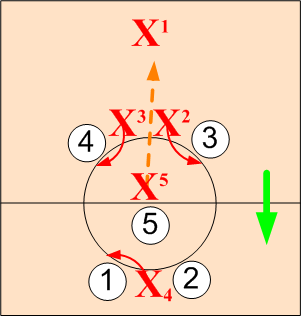
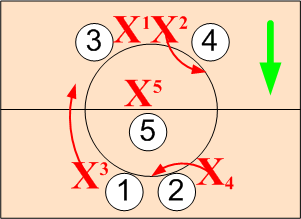
Diamond Alignment Rotations
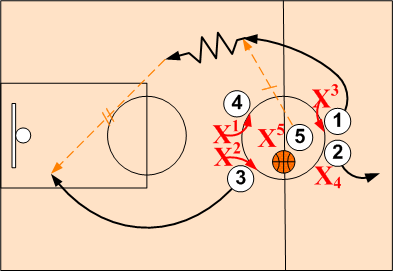
Defenders X3 and X4 grab the two sports in line with the basket. Non-jumpers box out.Defensive Alignment (vs box)
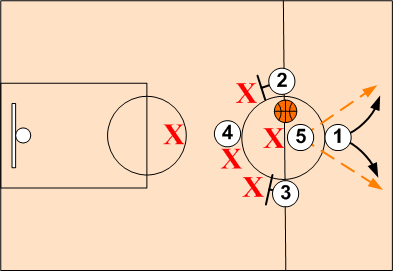
This defensive alignment places one defender back to protect the basket. It can be used when the opponent has an advantage on the jump ball. The best defender X1 is positioned back near the top of the free throw circle. Defenders X2 and X3 box out O3 and O4. Forward defender X4 anticipates tip and crashes open spot. Jumper X5 tries to tip back long to X1.
Defensive Alignment (vs Diamond)
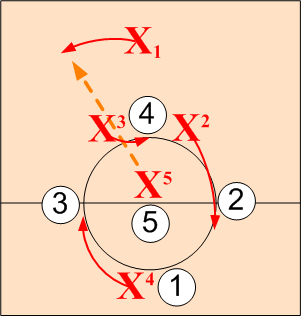
Clockwise Rotation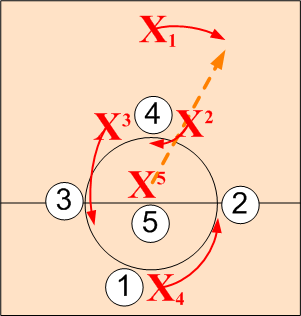
Counter-Clockwise RotationDefenders X2, X3 and X4 rotate clockwise or counter clockwise on predetermine signal. X5 tries to tip back long to X1.
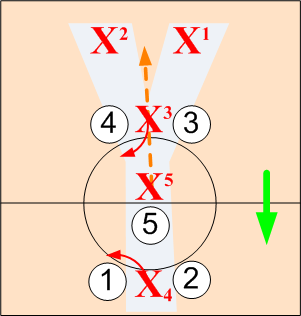
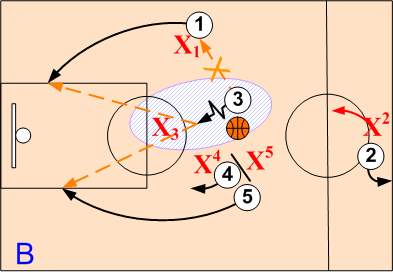
“Y” Defensive Alignment
Vs Box Alignment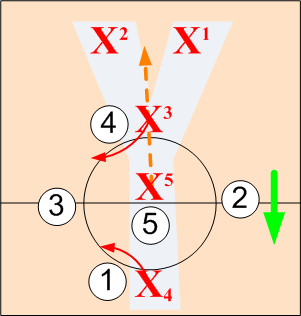
Vs Diamond AlignmentThe "Y" alignment places two players back. It can be used primarily when the opponent has a definite, superior jumper advantage and is prepared to run a jump ball play. By placing two defenders back, it eliminates any possibility of an easy shot off an out numbered defensive situation and forces the opponent into setting the ball up. The two back defenders are positioned near the top of the free throw circle. Defenders X3 and X4 anticipate the tip and crash open spots in an attempt to gain ball possession. Jumper X5 tries to tip back long to X1 or X2.
Caution: In the event that the opponent gains possession of the jump ball, a defensive stop becomes paramount. "A basket saved is a basket made."
Even Jump Balls

Even jump ball situations are very similar to offensive rebounds in that players must box out and establish inside position. Players must anticipate and rotate early. Watch jumper’s eye’s and hand in attempt to gain an advantage on jump. Jumpers will normally telegraph the direction in which they are going to tap the ball with most right handed jumpers tipping forward to their left, and left handed players tipping forward to their right.
Players rotate in a coordinated direction either clockwise or counter-clockwise, as the official tosses the ball, according to predetermined signal. Predetermine signal can be as simple of placing the right or left hand on the hip or head.
Clockwise and Counter-clockwise rotations can be very effective in crashing the opponent’s open spots. Successful ball possession involves good anticipation, agressiveness and determination.
vs Box Alignment
Clockwise Rotation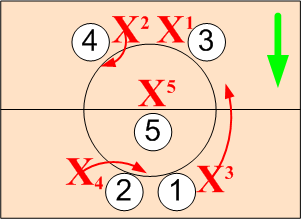
Counter-Clockwise Rotationvs Diamond Alignment

Clockwise Rotation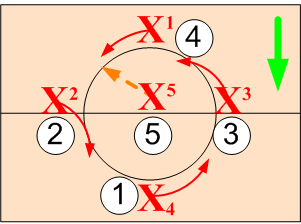
Counter-Clockwise Rotation
Proven Offensive Jump Ball Plays

When you have a 6" or greater height advantage you can run set jump ball plays. Just like the early days of the game on jump ball situations, it is a definite advantage to have a tall player. Generally, tip forward to biggest player. Also, be sure to maintain defensive balance. Upon gaining ball possession, if the defense should recover and a good shot is not available, flow directly into a set or motion offense. The following jump ball plays have proven to be successful over time and can be ran to either side of the court:
| Possession | Double Tap | Split | Jumper Fly | Forward Fly | Spread | Tandem | Loop |
Ball Possession
When the opponent concedes the tip by placing all players back, ball possession can be achieved by simply tipping back.
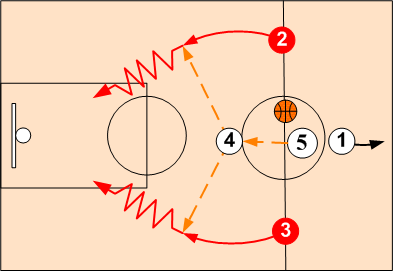
Jumper O5 tips ball forward to tallest player O4. The receiver 04 then taps or passes the ball out to a wing cutting to the basket. Jumper O5 should tip to the side opposite O4’s defender. Defender O1 and jumper O5 maintain defensive balance.
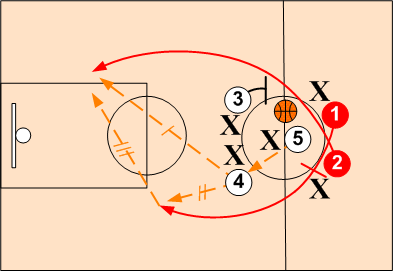
Post Split (Diamond Alignment)
Jumper O5 tips ball forward to tallest player O4. O1 and O2 split the jumper while O3 maintains defensive balance. The receiver O4 looks to feed either O1 or O2. The post split can also be ran to the opposite side with O1 and O3 splitting the post and O2 maintaining defensive balance.
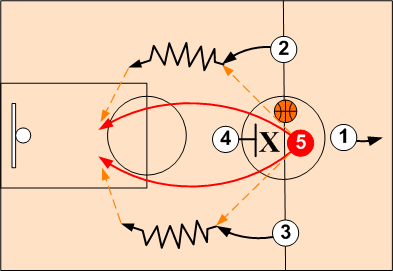
Post Split (Box Alignment)
Jumper O5 tips ball forward to tallest player O4. O1 and O3 screen for O2 splitting post. Receiver O4 looks to feed O2 cutting to the basket or pass out to O1 on the post split. Jumper O5 and screener O3 maintain defensive balance. The post split from a box alignment can also be ran opposite with O2 and O3 screening for O1.
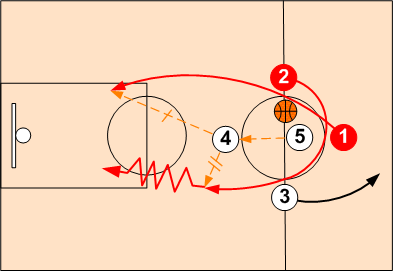
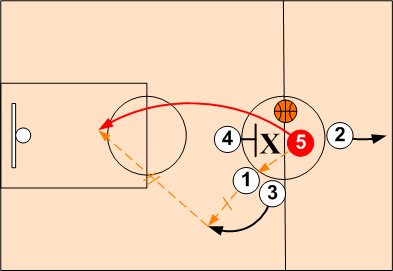
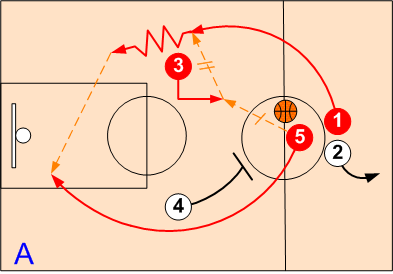
Jumper O5 tips directly out to a wing and cuts to the basket off of O4’s back screen. Wing looks to feed O5 while opposite wing spots up. O1 and screener O4 have defensive balance responsibilities and trail.
Jumper Fly (Unbalanced Alignment)
O1 and O3 align next to each other while O4 and O2 grab the spots in line with the basket. O5 tips to O1 who tips out or passes over head to O3 cutting to the basket. O4 sets a back screen for jumper O5. O3 looks to feed jumper O5 or to drive hard to the basket. O2 and O4 maintain defensive balance.
Jumper O5 tips directly out to O1 as O3 executes a quick release to the basket. O1 looks to feed O3 or dribble penetrate. O2 and O5 maintain defensive balance while O4 trails.
O3 and O4 spread out and align near free throw circle. On the center toss, O3 breaks back to receive the tip and O1 makes a quick release to outside lane. O3 looks to tip out or pass out to O1. O4 breaks back and sets a back screen for jumper O5. O1 looks to feed O5 or to drive hard to the basket. O4 trails and O2 maintains defensive balance.
When O3’s defender stays back, the tip receiver O3 dribble penetrates to the middle creating an out numbered 3-on-2 break with a trail. This spread offensive tip play can be ran on both sides of the court.

As official tosses ball up, O1 breaks across to receive tip from O5 and O3 sprint releases to basket. O2 circles off O4's screen and fills right lane. O4 and O5 maintain defensive balance.

Jumper O5 tips back to O4 who in turn passes to O2 breaking to right wing. Wing O3 breaks across to corner and loops back to opposite corner as O5 screens for O1. O2 passes ahead to O3 and cuts to basket. O3 looks to feed O2 on a "Give & Go" cut or to O1 looping off O5's screeen. O4 and O5 maintain defensive balance.
